自定义脚本属性
阅读本文大概需要 3 分钟。
在游戏开发中,脚本中常常存在一些需要反复修改的参数,比如玩家技能的范围、装饰品的大小等。如果这些参数写死在代码中修改起来相当不便,于是编辑器推出了脚本自定义属性功能,这个功能可以将脚本中的参数暴露在属性面板上,方便创作者修改。
在编辑器主界面的下方工程内容中,单击“脚本” 选项,然后单击 “新建脚本” 按钮,创建普通脚本并重命名为 PlayerControl :

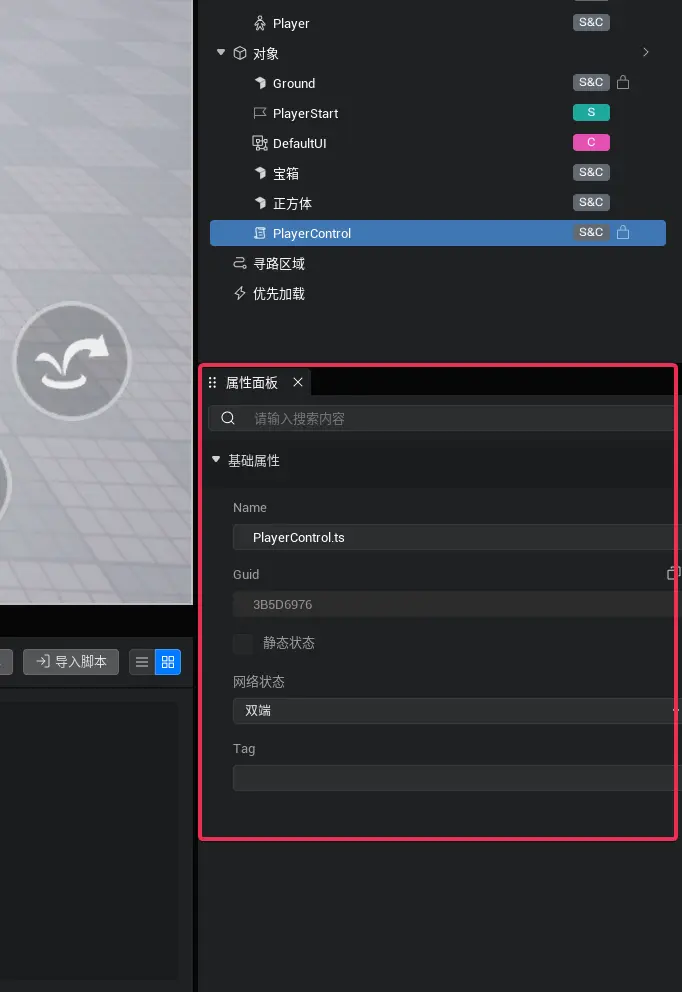
将 PlayerControl 脚本拖动到场景上并选中它,这时在它的属性面板上只有几个基础属性:
下面我们介绍,如何给脚本添加自定义属性,可视化的展示在属性面板中。
1)在 PlayerControl 脚本代码中添加一个 string 类型的属性'speed' ,如下所示:
typescript
@Component
export default class PlayerControl extends Script {
    public speed: string = "";

    /** 当脚本被实例后,会在第一帧更新前调用此函数 */
    protected onStart(): void { }
    //... 省略
}
@Component
export default class PlayerControl extends Script {
public speed: string = "";
/** 当脚本被实例后,会在第一帧更新前调用此函数 */
protected onStart(): void { }
//... 省略
}想要该属性可以显示在属性面板中,方便我们后期进行数值配置的话,仅仅定义了属性是不够的!此时只是定义了一个普通的成员变量,可以在脚本的其他函数中使用该变量而已。
2)如果希望在属性面板中可以看到该属性,方便后面直接在属性面板上修改的话,需要该属性的上一行添加一个非常重要的标记 @Property () ,代码如下所示:
typescript
@Component
export default class PlayerControl extends Core.Script {
    @Property()
    public speed: string = ""

    /** 当脚本被实例后,会在第一帧更新前调用此函数 */
    protected onStart(): void {}
    //... 省略
}
@Component
export default class PlayerControl extends Core.Script {
@Property()
public speed: string = ""
/** 当脚本被实例后,会在第一帧更新前调用此函数 */
protected onStart(): void {}
//... 省略
}- 代码修改后保存,回到编辑器,稍等几秒钟,选择一下其他的物体后,再重新选择
PlayerControl,看看属性面板中已经多了一个speed属性: 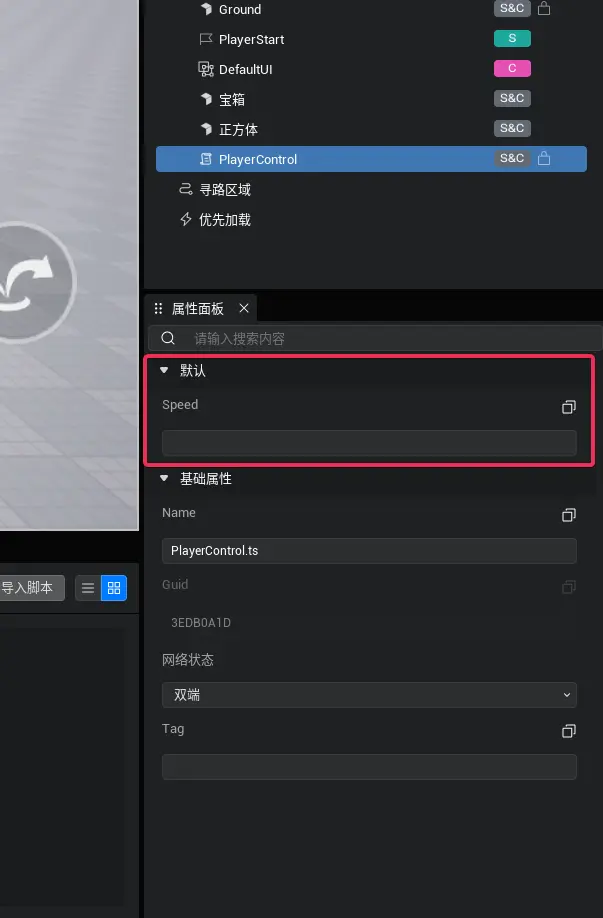
但是这里属性名称在脚本中叫做 speed,属性面板中也显示为 speed,可读性很不好,但是又最好不要更改代码里面的变量名称。我们可以给属性添加一个展示名称 “移动速度”,通过设置 displayName 的方式来改变展示名称:
ts
@Component
export default class PlayerControl extends Script {
    @Property({ displayName: "移动速度"})
    public speed: string = ""

    /** 当脚本被实例后,会在第一帧更新前调用此函数 */
    protected onStart(): void {}
}
@Component
export default class PlayerControl extends Script {
@Property({ displayName: "移动速度"})
public speed: string = ""
/** 当脚本被实例后,会在第一帧更新前调用此函数 */
protected onStart(): void {}
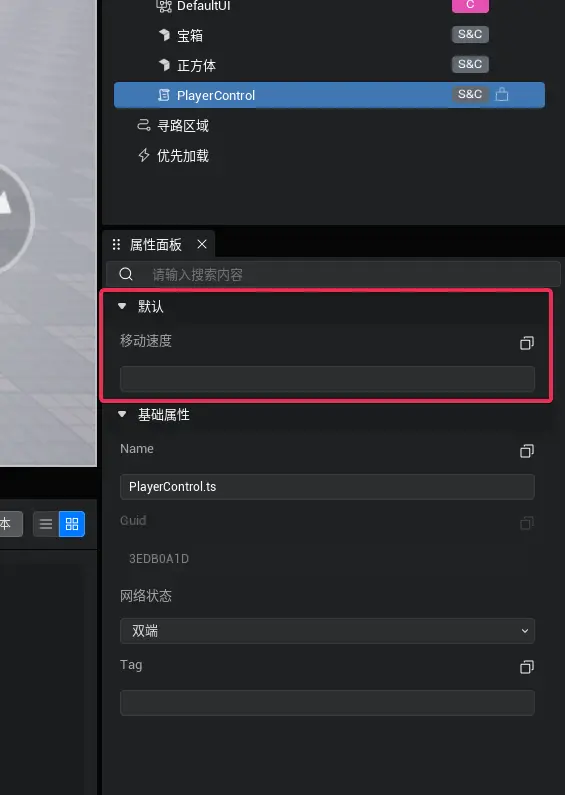
}保存后,回到编辑器可以看到(可能需要稍等几秒),这时候属性面板上的显示名称就发生改变了,如图:
在上面的代码中,“displayName” 就是一个属性配置,可以配置该属性在属性面板上的显示状态。除了 “displayName” 外,还有一些常用的属性配置,例如 “group” 可以将多个属性分组;capture 则可以为该属性添加一个吸管功能,点击吸管,再点击场景中任何游戏物体,就可以快捷获取到该物体的 GameObjectID,十分方便。代码与效果如图:
ts
@Component
export default class PlayerControl extends Script {
    @Property({ displayName: "移动速度", group: "移动设置"})
    public speed: string = ""

    @Property({displayName: "循环次数", group: "循环设置", range: { min: 1, max: 10000} })
    public loopCount: number = 1

    @Property({displayName: "操作对象的 GameObjectID", capture: true, group: "操作对象"})
    public objectGuid: string = ""

    /** 当脚本被实例后,会在第一帧更新前调用此函数 */
    protected onStart(): void { this.useUpdate = true; }

    /**
     * 周期函数 每帧执行
     * 此函数执行需要将 this.useUpdate 赋值为 true
     * @param dt 当前帧与上一帧的延迟 / 秒
     */
    protected onUpdate(dt: number): void { }

    /** 脚本被销毁时最后一帧执行完调用此函数 */
    protected onDestroy(): void {}
}
@Component
export default class PlayerControl extends Script {
@Property({ displayName: "移动速度", group: "移动设置"})
public speed: string = ""
@Property({displayName: "循环次数", group: "循环设置", range: { min: 1, max: 10000} })
public loopCount: number = 1
@Property({displayName: "操作对象的 GameObjectID", capture: true, group: "操作对象"})
public objectGuid: string = ""
/** 当脚本被实例后,会在第一帧更新前调用此函数 */
protected onStart(): void { this.useUpdate = true; }
/**
* 周期函数 每帧执行
* 此函数执行需要将 this.useUpdate 赋值为 true
* @param dt 当前帧与上一帧的延迟 / 秒
*/
protected onUpdate(dt: number): void { }
/** 脚本被销毁时最后一帧执行完调用此函数 */
protected onDestroy(): void {}
}