攻击反馈
目前我们的角色发起攻击后给玩家带来的反馈较少,本节课将通过动画、音效、特效、倒计时、飘字这5个方面来提升攻击反馈。
1.攻击动画
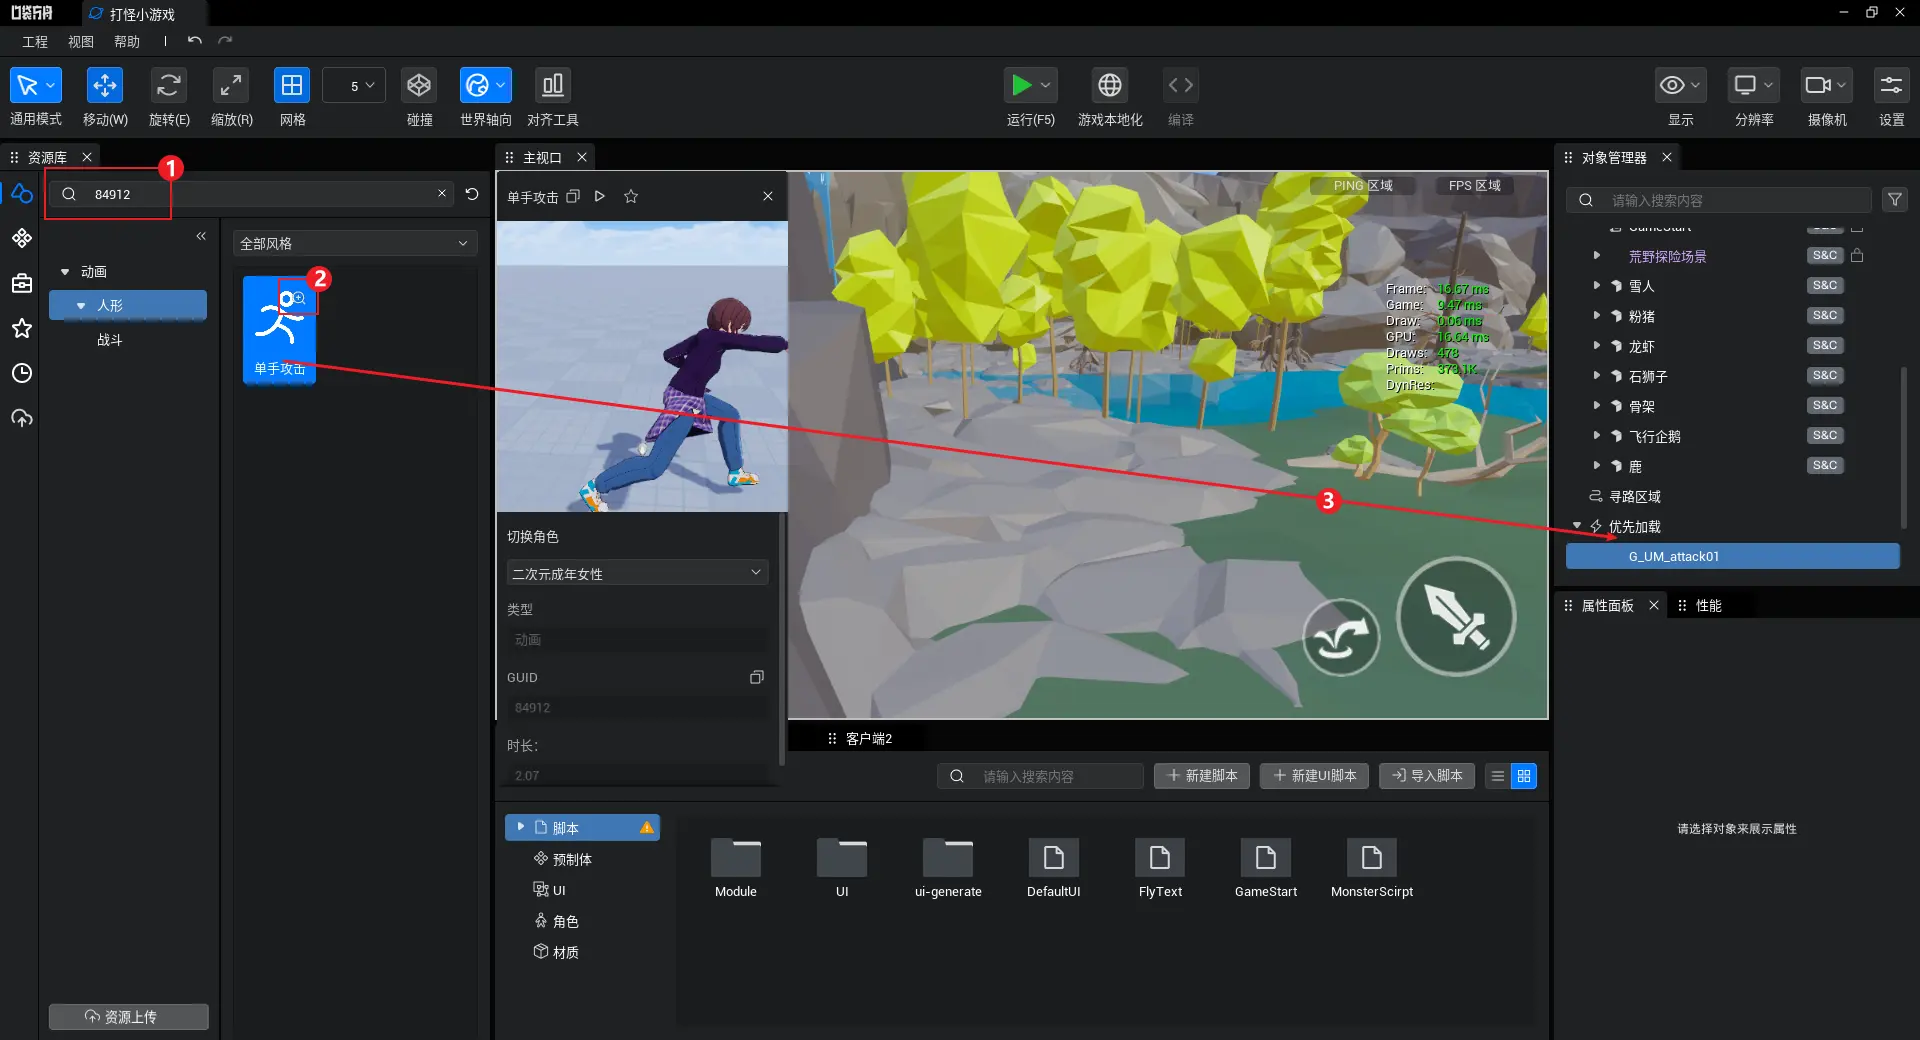
首先需要找到一个自己喜欢的攻击动画
① 我们可以在本地资源库中寻找自己喜欢的动画,在这里我使用的动画 AssetID:84912
② 点击动画资源右上角的放大镜可以进行预览
③ 将需要使用的动画拖入到优先加载(如果不拖会导致资源加载失败,使用不生效)
为了让动画能够同步播放,所以我们需要在服务端播放动画。
由于我们使用了模块管理,所以可以在PlayerModuleS中添加一个播放动画的网络方法
PlayerModuleS脚本:
此次添加逻辑的要点:
① 添加了 net_playAnim 这个函数来播放动画
② net_playAnim是一个网络方法
网络方法
在模块管理中,以"net_"开头命名的函数,会在模块注册的时候,注册为“网络方法”。
所谓网络方法就是可以提供让服务端模块调用客户端模块函数、客户端模块调用服务端模块函数。
通过这种方式,将原本需要来回添加事件监听逻辑的写法,简化为只需要加上"net_"
③ 使用loadAnimation给character加载了一个动画,并立即播放
ts
import { PlayerModuleC } from "./PlayerModuleC";

export class PlayerModuleS extends ModuleS<PlayerModuleC, null>{

    protected onStart(): void {
        console.log("角色服务端模块启动")
    }

    public net_playAnim() {
        // 播放攻击动作
        this.currentPlayer.character.loadAnimation("84912").play()
    }
}
import { PlayerModuleC } from "./PlayerModuleC";
export class PlayerModuleS extends ModuleS<PlayerModuleC, null>{
protected onStart(): void {
console.log("角色服务端模块启动")
}
public net_playAnim() {
// 播放攻击动作
this.currentPlayer.character.loadAnimation("84912").play()
}
}服务端模块有了播放动画的函数后,客户端模块只需要在对应的位置调用即可。
PlayerModuleC脚本:
通过this.server来调用服务端模块的网络方法
ts
import MonsterScirpt from "../MonsterScirpt";
import { PlayerModuleS } from "./PlayerModuleS";

export class PlayerModuleC extends ModuleC<PlayerModuleS, PlayerModuleData>{

    private _nowAtk: number = 50

    protected async onStart(): Promise<void> {
        console.log("角色客户端模块启动")
    }

    public atk() {
        // 范围检测
        let result = QueryUtil.sphereOverlap(this.localPlayer.character.worldTransform.position, 100, false)
        // 筛选出怪物
        for (let obj of result) {
            if (obj instanceof Character) {
                continue
            }

            if (obj.tag == "Monster") {
                // 让怪物受伤
                let scripts = obj.getScripts()
                for (let script of scripts) {
                    if (script instanceof MonsterScirpt) {
                        let damage = script.hurt(this._nowAtk)
                    }
                }
            }
        }

        this.server.net_playAnim()

    }
}
import MonsterScirpt from "../MonsterScirpt";
import { PlayerModuleS } from "./PlayerModuleS";
export class PlayerModuleC extends ModuleC<PlayerModuleS, PlayerModuleData>{
private _nowAtk: number = 50
protected async onStart(): Promise<void> {
console.log("角色客户端模块启动")
}
public atk() {
// 范围检测
let result = QueryUtil.sphereOverlap(this.localPlayer.character.worldTransform.position, 100, false)
// 筛选出怪物
for (let obj of result) {
if (obj instanceof Character) {
continue
}
if (obj.tag == "Monster") {
// 让怪物受伤
let scripts = obj.getScripts()
for (let script of scripts) {
if (script instanceof MonsterScirpt) {
let damage = script.hurt(this._nowAtk)
}
}
}
}
this.server.net_playAnim()
}
}由于我们在PlayerModuleC中已经实现了角色播放攻击动画的逻辑,所以需要将DefaultUI中播放动画的逻辑删除,避免动画冲突。
DefaultUI脚本:
修改过后的完整脚本
ts
import { PlayerModuleC } from "./Module/PlayerModuleC";

@UIBind('')
export default class DefaultUI extends UIScript {
	private character: Character;
	private anim1 = null;

	/** 仅在游戏时间对非模板实例调用一次 */
	protected onStart() {
		//设置能否每帧触发onUpdate
		this.canUpdate = false;

		//找到对应的跳跃按钮
		const jumpBtn = this.uiWidgetBase.findChildByPath('RootCanvas/Button_Jump') as Button
		const attackBtn = this.uiWidgetBase.findChildByPath('RootCanvas/Button_Attack') as Button

		//点击跳跃按钮,异步获取人物后执行跳跃
		jumpBtn.onPressed.add(() => {
			if (this.character) {
				this.character.jump();
			} else {
				Player.asyncGetLocalPlayer().then((player) => {
					this.character = player.character;
					//角色执行跳跃功能
					this.character.jump();
				});
			}
		})

		//点击攻击按钮,异步获取人物后执行攻击动作
		attackBtn.onPressed.add(() => {
			ModuleService.getModule(PlayerModuleC).atk()
		})
	}
}
import { PlayerModuleC } from "./Module/PlayerModuleC";
@UIBind('')
export default class DefaultUI extends UIScript {
private character: Character;
private anim1 = null;
/** 仅在游戏时间对非模板实例调用一次 */
protected onStart() {
//设置能否每帧触发onUpdate
this.canUpdate = false;
//找到对应的跳跃按钮
const jumpBtn = this.uiWidgetBase.findChildByPath('RootCanvas/Button_Jump') as Button
const attackBtn = this.uiWidgetBase.findChildByPath('RootCanvas/Button_Attack') as Button
//点击跳跃按钮,异步获取人物后执行跳跃
jumpBtn.onPressed.add(() => {
if (this.character) {
this.character.jump();
} else {
Player.asyncGetLocalPlayer().then((player) => {
this.character = player.character;
//角色执行跳跃功能
this.character.jump();
});
}
})
//点击攻击按钮,异步获取人物后执行攻击动作
attackBtn.onPressed.add(() => {
ModuleService.getModule(PlayerModuleC).atk()
})
}
}2.攻击音效
首先需要找到一个自己喜欢的攻击音效
① 我们可以在本地资源库中寻找自己喜欢的音效,在这里我使用的动画 AssetID:209818
② 点击音效资源右上角的放大镜可以打开预览面板s
③ 点击播放按钮即可预览音效
④ 将需要使用的音效拖入到优先加载(如果不拖会导致资源加载失败,使用不生效)

播放音效只需要在客户端进行播放,所以在客户端模块添加对应代码即可
PlayerModuleC脚本:
使用SoundService.playSound播放音效209818
ts
export class PlayerModuleC extends ModuleC<PlayerModuleS, PlayerModuleData>{

    public atk() {
    	// 省略代码
        ......

        this.server.net_playAnim()

        // 播放音效
        SoundService.playSound("209818", 1)
    }
}
export class PlayerModuleC extends ModuleC<PlayerModuleS, PlayerModuleData>{
public atk() {
// 省略代码
......
this.server.net_playAnim()
// 播放音效
SoundService.playSound("209818", 1)
}
}除了角色攻击时需要攻击音效,怪物受到攻击时也需要播放音效。将135757这个音效资源拖入优先加载后,来到MonsterScript脚本添加如下逻辑:
使用SoundService.playSound播放音效135757
ts
@Component
export default class MonsterScirpt extends Script {
	// 省略代码
    ......

    public hurt(damage: number) {
        if (this.nowHP <= 0) { return 0 }
        this.hurtOnServer(damage)

        SoundService.playSound("135757", 1)

        return damage
    }
}
@Component
export default class MonsterScirpt extends Script {
// 省略代码
......
public hurt(damage: number) {
if (this.nowHP <= 0) { return 0 }
this.hurtOnServer(damage)
SoundService.playSound("135757", 1)
return damage
}
}3.怪物死亡特效
首先需要在本地资源库中找到一个自己喜欢的怪物死亡特效,预览逻辑和动画、音效一致,在这里我使用的特效 AssetID 为142750,搜索到对应特效,拖入到优先加载即可。
怪物死亡特效需要在怪物死亡时进行播放,所以我们在怪物脚本中添加逻辑:
MonsterScript脚本:
使用EffectService.playAtPosition播放特效142750
ts
@Component
export default class MonsterScirpt extends Script {

    // 省略代码
    ......

    @mw.RemoteFunction(mw.Server)
    private hurtOnServer(damage: number) {
        // 扣血
        this.nowHP = this.nowHP - damage < 0 ? 0 : this.nowHP - damage
        // 死亡逻辑
        if (this.nowHP <= 0) {
            this.gameObject.setVisibility(false)

            EffectService.playAtPosition("142750", this.gameObject.worldTransform.position)

            // 怪物复活
            setTimeout(() => {
                this.gameObject.setVisibility(true)
                this.nowHP = this.maxHP
            }, (this.time + 1) * 1000);
        }

    }
}
@Component
export default class MonsterScirpt extends Script {
// 省略代码
......
@mw.RemoteFunction(mw.Server)
private hurtOnServer(damage: number) {
// 扣血
this.nowHP = this.nowHP - damage < 0 ? 0 : this.nowHP - damage
// 死亡逻辑
if (this.nowHP <= 0) {
this.gameObject.setVisibility(false)
EffectService.playAtPosition("142750", this.gameObject.worldTransform.position)
// 怪物复活
setTimeout(() => {
this.gameObject.setVisibility(true)
this.nowHP = this.maxHP
}, (this.time + 1) * 1000);
}
}
}4.怪物复活倒计时
虽然怪物有复活时间这个属性,但目前并没有在游戏中展示出来给玩家,所以我们可以通过怪物UI来将死亡倒计时进行展示。
首先在MonsterUI脚本中添加倒计时函数
使用一个间隔函数来进行复活倒计时,每一秒改变血条文本所显示的内容
ts
export default class MonsterUI extends MonsterUI_Generate {
    // 省略代码
    ......

    /**复活倒计时 */
    public openClock(time: number) {
        this.mHP_txt.text = "复活倒计时:" + time
        let inter = setInterval(() => {
            time -= 1
            this.mHP_txt.text = "复活倒计时:" + time
            if (time <= 0) {
                clearInterval(inter)
            }
        }, 1000)
    }
}
export default class MonsterUI extends MonsterUI_Generate {
// 省略代码
......
/**复活倒计时 */
public openClock(time: number) {
this.mHP_txt.text = "复活倒计时:" + time
let inter = setInterval(() => {
time -= 1
this.mHP_txt.text = "复活倒计时:" + time
if (time <= 0) {
clearInterval(inter)
}
}, 1000)
}
}有了倒计时UI函数,也就意味着MonsterUI具备了倒计时功能,所以我们只需要在判断到怪物死亡的时候,开启这个倒计时即可
在MonsterScript脚本中判断怪物死亡,并开启倒计时
在血量发生变化时,判断到血量小于或者等于0,那么就开启复活倒计时
ts
@Component
export default class MonsterScirpt extends Script {
    // 省略代码
    ......

    private onHPChanged() {
        // 调用血条刷新的逻辑
        if (this.monsterUI) {
            this.monsterUI.freshHP(this.nowHP)

            if (this.nowHP <= 0) {
                this.monsterUI.openClock(this.time)
            }
        }

    }

}
@Component
export default class MonsterScirpt extends Script {
// 省略代码
......
private onHPChanged() {
// 调用血条刷新的逻辑
if (this.monsterUI) {
this.monsterUI.freshHP(this.nowHP)
if (this.nowHP <= 0) {
this.monsterUI.openClock(this.time)
}
}
}
}5.伤害飘字
伤害飘字是最常见的攻击反馈,在这里我提供了编写好的飘字脚本,大家只需要复制粘贴到工程里就可以使用啦~
步骤一:创建飘字脚本
这个脚本不需要拖动到场景中,大家只需要新建一个脚本,然后将内容粘贴进去即可。
飘字代码:
ts
export class FlyText {
    // 单例模式
    private static _instance: FlyText
    public static get instance() {
        if (FlyText._instance == null) {
            FlyText._instance = new FlyText()
        }
        return FlyText._instance
    }

    private _uiWidget: UserWidget
    private _rootCanvas: Canvas
    private _textPools: TextBlock[] = []


    /**默认文本框大小(由于开启了自适应,所以文本框有多大,文本就有多大) */
    private _defaultTextSize: Vector2 = new Vector2(150, 80)
    /**默认文本颜色 */
    private _defaultFontColor: LinearColor = LinearColor.yellow


    /**
     * 展示飘字
     * @param content 内容
     * @param worldLocation 世界坐标
     * @param color 颜色(可选)
     */
    public showFlyText(content: string, worldLocation: Vector, color?: LinearColor) {
        // 将世界坐标转换为屏幕坐标
        let vec2 = InputUtil.projectWorldPositionToWidgetPosition(worldLocation, true).screenPosition;
        // 对象池处理
        let textBlock: TextBlock;
        if (this._textPools.length == 0) {
            textBlock = this.createText()
        } else {
            textBlock = this._textPools.pop();
        }
        // 给一点初始偏移,方便做动画
        vec2.x -= 120
        vec2.y -= 160;
        let toX = this.getRandomIntInclusive(100, 300);
        Math.random() < 0.5 ? toX = -toX : toX = toX;
        let toY = this.getRandomIntInclusive(-300, 100);
        // 用Tween,并结合PI来做曲线动画
        let animator = new Tween({ a: 0 }).to({ a: Math.PI }, 1000).onUpdate((object) => {
            textBlock.position = vec2.clone().add(new Vector2(toX * object.a / Math.PI, toY * Math.sin(object.a)));
            textBlock.renderScale = new Vector2(Math.sin(object.a));
        }).onStart(() => {
            textBlock.fontColor = color ? color : this._defaultFontColor
            textBlock.text = content;
            textBlock.visibility = SlateVisibility.SelfHitTestInvisible
        }).onComplete(() => {
            textBlock.visibility = SlateVisibility.Hidden
            this._textPools.push(textBlock);
        })
        animator.start();
    }


    /**创建一个文本框 */
    private createText() {
        // 首次创建,如果没有UI对象,就创建一个
        if (!this._uiWidget) {
            // 创建一个UI对象
            this._uiWidget = UserWidget.newObject();
            this._uiWidget.addToViewport(1)
            // 首次创建,如果没有rootCanvas,就创建一个
            if (!this._rootCanvas) {
                this._rootCanvas = Canvas.newObject()
                this._rootCanvas.size = new Vector2(1920, 1080);
                this._rootCanvas.position = Vector2.zero
                this._uiWidget.rootContent = this._rootCanvas
            }
        }
        // 创建一个文本框,并添加到画布上
        let textBlock = TextBlock.newObject(this._rootCanvas)
        textBlock.size = this._defaultTextSize
        // 开启文本自适应
        textBlock.autoAdjust = true
        return textBlock
    }

    /**得到一个两数之间的随机整数,包括两个数在内 */
    private getRandomIntInclusive(min: number, max: number) {
        min = Math.ceil(min);
        max = Math.floor(max);
        return Math.floor(Math.random() * (max - min + 1)) + min; //含最大值,含最小值
    }

}
export class FlyText {
// 单例模式
private static _instance: FlyText
public static get instance() {
if (FlyText._instance == null) {
FlyText._instance = new FlyText()
}
return FlyText._instance
}
private _uiWidget: UserWidget
private _rootCanvas: Canvas
private _textPools: TextBlock[] = []
/**默认文本框大小(由于开启了自适应,所以文本框有多大,文本就有多大) */
private _defaultTextSize: Vector2 = new Vector2(150, 80)
/**默认文本颜色 */
private _defaultFontColor: LinearColor = LinearColor.yellow
/**
* 展示飘字
* @param content 内容
* @param worldLocation 世界坐标
* @param color 颜色(可选)
*/
public showFlyText(content: string, worldLocation: Vector, color?: LinearColor) {
// 将世界坐标转换为屏幕坐标
let vec2 = InputUtil.projectWorldPositionToWidgetPosition(worldLocation, true).screenPosition;
// 对象池处理
let textBlock: TextBlock;
if (this._textPools.length == 0) {
textBlock = this.createText()
} else {
textBlock = this._textPools.pop();
}
// 给一点初始偏移,方便做动画
vec2.x -= 120
vec2.y -= 160;
let toX = this.getRandomIntInclusive(100, 300);
Math.random() < 0.5 ? toX = -toX : toX = toX;
let toY = this.getRandomIntInclusive(-300, 100);
// 用Tween,并结合PI来做曲线动画
let animator = new Tween({ a: 0 }).to({ a: Math.PI }, 1000).onUpdate((object) => {
textBlock.position = vec2.clone().add(new Vector2(toX * object.a / Math.PI, toY * Math.sin(object.a)));
textBlock.renderScale = new Vector2(Math.sin(object.a));
}).onStart(() => {
textBlock.fontColor = color ? color : this._defaultFontColor
textBlock.text = content;
textBlock.visibility = SlateVisibility.SelfHitTestInvisible
}).onComplete(() => {
textBlock.visibility = SlateVisibility.Hidden
this._textPools.push(textBlock);
})
animator.start();
}
/**创建一个文本框 */
private createText() {
// 首次创建,如果没有UI对象,就创建一个
if (!this._uiWidget) {
// 创建一个UI对象
this._uiWidget = UserWidget.newObject();
this._uiWidget.addToViewport(1)
// 首次创建,如果没有rootCanvas,就创建一个
if (!this._rootCanvas) {
this._rootCanvas = Canvas.newObject()
this._rootCanvas.size = new Vector2(1920, 1080);
this._rootCanvas.position = Vector2.zero
this._uiWidget.rootContent = this._rootCanvas
}
}
// 创建一个文本框,并添加到画布上
let textBlock = TextBlock.newObject(this._rootCanvas)
textBlock.size = this._defaultTextSize
// 开启文本自适应
textBlock.autoAdjust = true
return textBlock
}
/**得到一个两数之间的随机整数,包括两个数在内 */
private getRandomIntInclusive(min: number, max: number) {
min = Math.ceil(min);
max = Math.floor(max);
return Math.floor(Math.random() * (max - min + 1)) + min; //含最大值,含最小值
}
}步骤二:调用飘字函数
在怪物受伤时调用飘字脚本提供的函数来展示飘字。
MonsterScript脚本:
将伤害值作为飘字内容,从怪物模型的位置产生飘字
ts
import { FlyText } from "./FlyText"
import MonsterUI from "./UI/MonsterUI"

@Component
export default class MonsterScirpt extends Script {

    public hurt(damage: number) {
        if (this.nowHP <= 0) { return 0 }
        this.hurtOnServer(damage)
        SoundService.playSound("135757", 1)

        FlyText.instance.showFlyText(damage.toFixed(0), this.gameObject.worldTransform.position)

        return damage
    }

}
import { FlyText } from "./FlyText"
import MonsterUI from "./UI/MonsterUI"
@Component
export default class MonsterScirpt extends Script {
public hurt(damage: number) {
if (this.nowHP <= 0) { return 0 }
this.hurtOnServer(damage)
SoundService.playSound("135757", 1)
FlyText.instance.showFlyText(damage.toFixed(0), this.gameObject.worldTransform.position)
return damage
}
}步骤三:在主循环中对Tween进行驱动
因为飘字使用了Tween这个函数库,它需要被驱动后才能够执行。
在GameStart脚本中对Tween进行驱动
ts
import { PlayerModuleC } from "./Module/PlayerModuleC";
import { PlayerModuleData } from "./Module/PlayerModuleData";
import { PlayerModuleS } from "./Module/PlayerModuleS";

@Component
export default class GameStart extends Script {

    /** 当脚本被实例后,会在第一帧更新前调用此函数 */
    protected onStart(): void {
        this.useUpdate = true

        ModuleService.registerModule(PlayerModuleS, PlayerModuleC, PlayerModuleData)
    }

    /**
     * 周期函数 每帧执行
     * 此函数执行需要将this.useUpdate赋值为true
     * @param dt 当前帧与上一帧的延迟 / 秒
     */
    protected onUpdate(dt: number): void {
        // 对Tween进行了驱动
        TweenUtil.TWEEN.update()
    }

    /** 脚本被销毁时最后一帧执行完调用此函数 */
    protected onDestroy(): void {

    }
}
import { PlayerModuleC } from "./Module/PlayerModuleC";
import { PlayerModuleData } from "./Module/PlayerModuleData";
import { PlayerModuleS } from "./Module/PlayerModuleS";
@Component
export default class GameStart extends Script {
/** 当脚本被实例后,会在第一帧更新前调用此函数 */
protected onStart(): void {
this.useUpdate = true
ModuleService.registerModule(PlayerModuleS, PlayerModuleC, PlayerModuleData)
}
/**
* 周期函数 每帧执行
* 此函数执行需要将this.useUpdate赋值为true
* @param dt 当前帧与上一帧的延迟 / 秒
*/
protected onUpdate(dt: number): void {
// 对Tween进行了驱动
TweenUtil.TWEEN.update()
}
/** 脚本被销毁时最后一帧执行完调用此函数 */
protected onDestroy(): void {
}
}Tween
有关Tween的相关知识点可以阅读:Tween - 补间动画 | 教程 (ark.online)
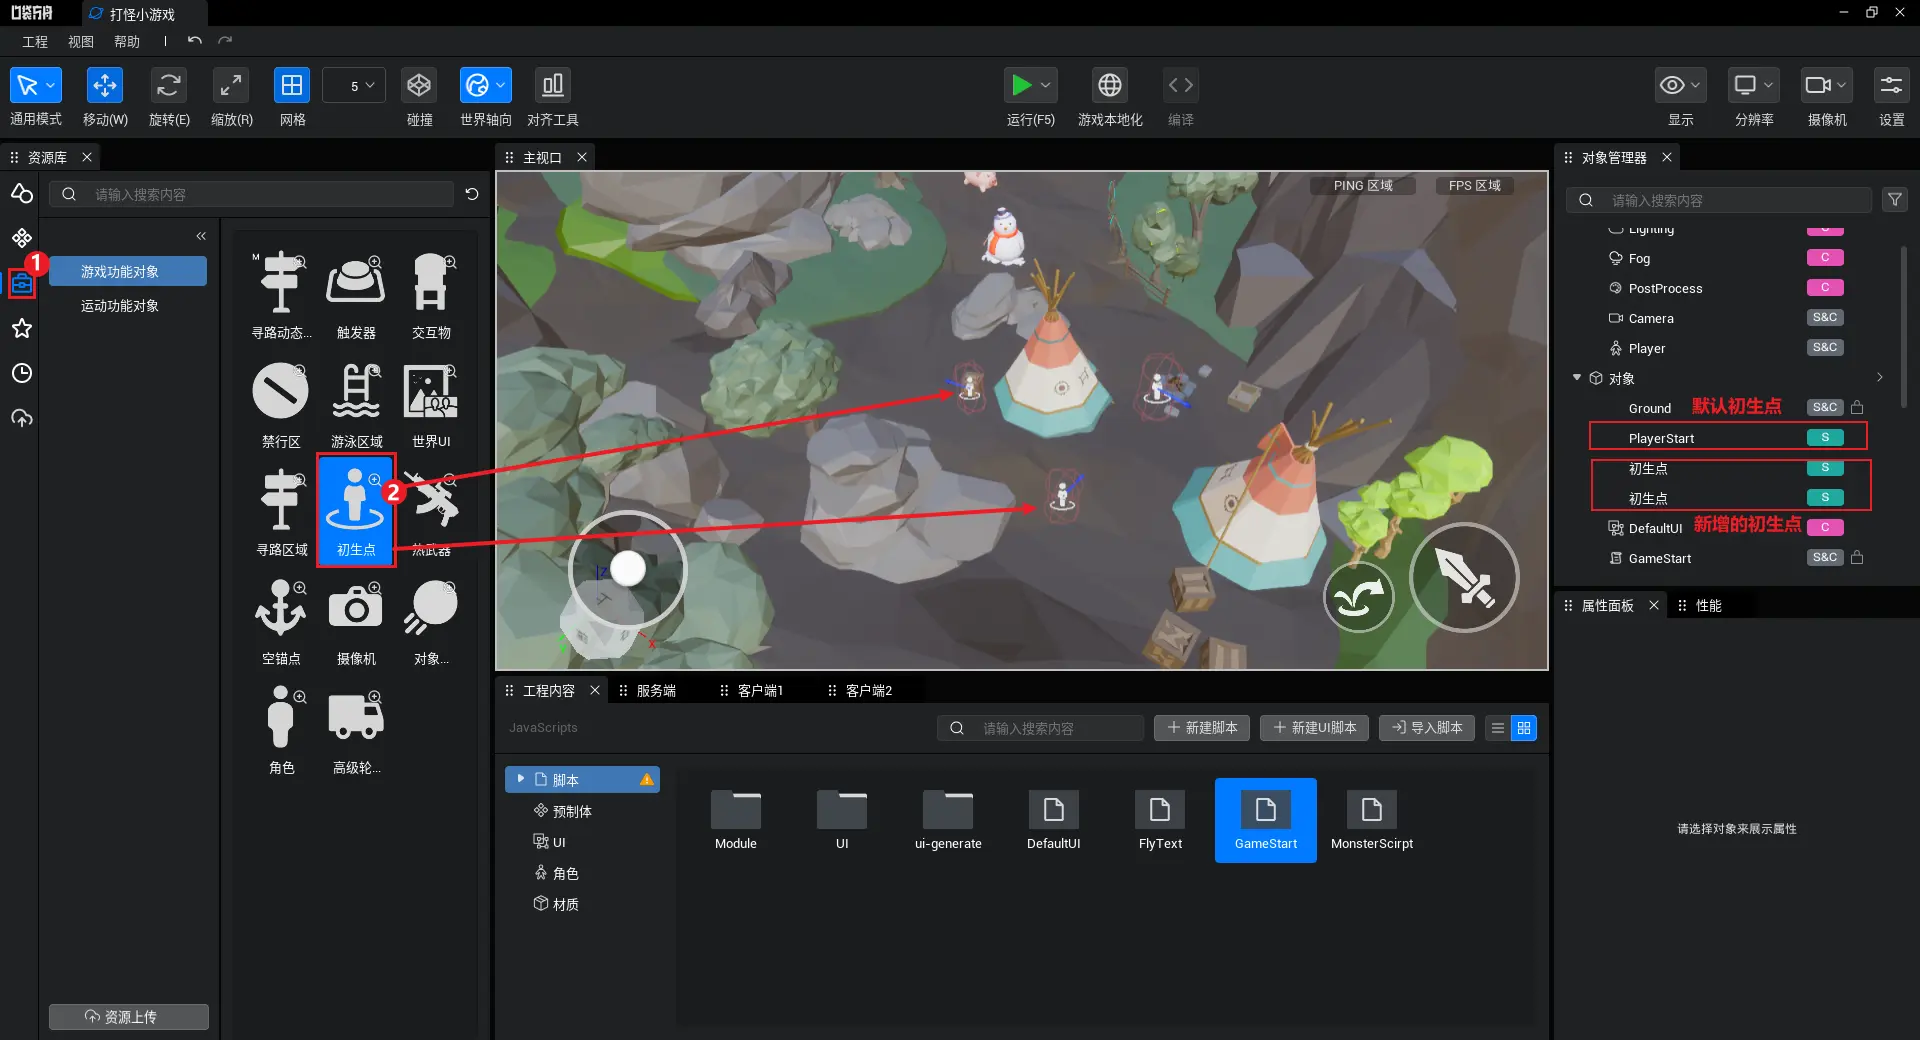
6.避免角色出生位置重合
由于目前场景上只有一个初生点,这会导致玩家在同一时间进入游戏的时候,角色创建在同一个位置,然后出现角色被弹开的情况。
因此我们需要通过在场景中新增初生点的方式来避免这个问题:
① 在资源库中选择“游戏功能对象”
② 将“初生点”放置在场景中。(一般对于10人以下的游戏,3~5个就足够了)